5 Easy Steps How To Scan Artwork
Scanning artwork can be a wonderfully fulfilling process, allowing artists to digitize and share their precious creations. Whether you’re an experienced or a self taught artist, converting your physical art into a digital format opens up possibilities – from creating an online portfolio to selling art prints of your work. However, learning how to scan artwork can seem daunting at first, especially when trying to maintain the integrity and quality of your original piece. In this guide, we’ll walk you through five easy steps to scan artwork effectively, ensuring that every pixel captures the essence of your masterpiece.
What is Scanning Artwork?
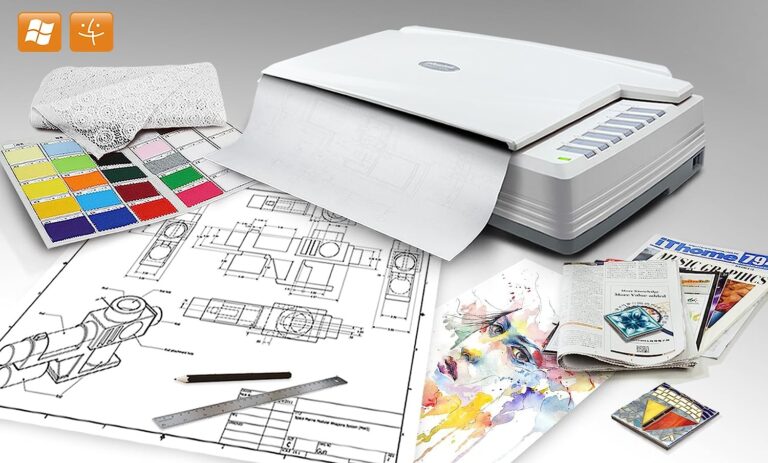
Scanning an artwork involves using a specialized device, a scanner, to capture a high-quality digital representation of an original artwork. This process is indispensable for artists who must create a digital portfolio archive, publish works online, or reproduce art prints. Unlike simply photographing artwork, scanners provide a level of detail, color accuracy, and consistency that is hard to match.
Reasons You Need to Know How to Scan Artwork
Before delving into the ‘how,’ let’s consider the ‘why.’ Learning how to scan artwork is essential for several reasons:
- Archiving: Digitizing artwork is an excellent way to create a comprehensive, organized record of your creative journey.
- Sharing: Instead of a flat and potentially distorted photo, an artwork scan preserves the depth, texture, and color fidelity as the artist intended, facilitating a rich viewing experience.
- Reproduction: High resolution scans are the foundation for creating prints and merchandise, ensuring that the reproduced items closely match the art work.
- Editing: Scans offer a level of detail perfect for subsequent digital editing, allowing artists to make subtle or significant changes to their work.
What is required to Scan Your Artwork
To scan your artwork, you will need the following:
- High Resolution Scanner: Choose a flatbed scanner that can handle the size of your artwork and a higher dpi.
- Your Artwork: Make sure your artwork is clean and flat for the best scanning results.
- Scanner Software: Install the necessary software with your scanner or use a third-party image editing application capable of scanning.
- Image Editing Software: Access to software such as Photoshop or GIMP to make post-scan adjustments.
- Computer: I recommend using a computer with solid hardware performance. Editing high quality images can take up a lot of resources. Debatable, a computer with a high-end GPU may boost speed when editing in Photoshop.
- Printer: You should invest in a printer to print crisp images with vibrant colors.
- Storage: Invest in an SSD hard drive to store all your high-resolution scans. Regular hard drives are sufficient for everyday tasks, but an SSD is much faster when working with large files.
Step-by-Step Instructions on How to Scan Artwork
Step One: Preparing Your Artwork and Scanner
Start by ensuring your artwork is clean and free from dust and smudges. Use a recommended clean, soft brush to eliminate any particles. Remove your artwork gently to avoid damage or distortion if it is framed. If your piece is on a canvas or another thick material, flatten it as much as possible without damaging it, as any folds or creases may distort the final scanned image. Next, check the scanner’s surface and use a glass cleaner; a flawless scan requires the artwork and scanner bed to be debris-free.
Step Two: Adjusting the Scanner Resolution and Settings
Prioritize optical resolution—it’s the most important setting for capturing the finest details of your artwork. I recommend setting the pixel density to at least 600 dpi, dots per inch, to achieve good results, in my opinion. The higher the dpi, the larger the file size will be for the scanned images. If storage and time are not factors, then you can go for maximum resolution, but be aware of the large image size. This will also make the scan process even longer, but it is worth the print quality. Also, make sure you select the correct file type, which is most commonly TIF file. Do not use other file types.
Step Three: Scanning Process
Time to scan! Position your artwork face down on the scanner bed to avoid light reflections. Use the flatbed cover to minimize light leakage into the scanner. Your scanner software should have an option for choosing a selection area with a white background, or you can adjust it in post-processing. Preview your scan and make any necessary adjustments before starting the final scan.
Step Four: Post-Processing
After the scan is completed, save your image file to a destination folder on your computer. Now, you can utilize image-editing software like Adobe Photoshop to crop, adjust levels, and enhance the scan to match the original better. Ensure you have a perfectly square crop. Sticking to brightness and contrast adjustments is a safe start if you are unfamiliar with post-processing tools. Being proficient in photo editing software may be a new skill from traditional painting. Take the time to at least learn the basics so you can easily edit your image file.
Step Five: Print Your Artwork
Once you have a digital copy of your artwork, start printing your image. For artists who want to have the white ink effect, you can use white paper instead of printing using white ink.
After printing, ensure the image is the same size as the printed paper. It allows artists to create a physical portfolio for presentations or gallery submissions. Additionally, artists looking to sell their work can produce prints for commerce.
For many, a printed replica is the closest one can get to owning the original art piece, making it an essential aspect of an artist’s distribution strategy. Printing your images is what allows your art to be scalable. Furthermore, it lets the artist inspect the outcome after printing to compare it to the digital version, ensuring that the essence of the artwork is preserved in both realms.
Key Considerations For Successfully Scanning Artwork
- Lighting Conditions: Always scan your artwork in a well-lit environment to ensure even lighting and minimize shadows that could alter the appearance of your scan.
- Color Calibration: Regularly calibrate your scanner to maintain color accuracy between the artwork and the scanned digital image.
- Handling: Handle your artwork and the scanner carefully during the process to avoid any damage or alterations to the artwork or equipment.
- Backing Up Scans: Always back up your digital copies in multiple locations to prevent data loss due to hardware failure or accidental deletion.
- Scanner Maintenance: Keep your scanner clean and dust-free by wiping the glass regularly with a soft, non-abrasive cloth.
- Paper Size for Print: Make sure when you print, it will fit the size of your scanned artwork, and use high-quality paper for optimal results.
- Scanning Fragile or Large Artwork: If your art medium is delicate, consider using a third party for professional scanning and handling it without causing damage. The third-party vendor is also known as a scanning bureau. However, be aware that there will be an extra cost.
Taking it to the Next Level:
If you want to refine your scanning skills, consider investing in professional scanners or outsourcing your professional scanning task to a print shop or service provider with experienced personnel who scan artwork. They will ensure the correct use of software controls and hardware settings, and you’ll get a superb scan without the learning curve. They can also print your artwork if you choose not to invest in an expensive printer. Alternatively, you can rent or borrow sophisticated scanners if hiring a professional may not fit your budget.
FAQ
What kind of Scanner should I buy?
A professional-grade flatbed scanner with a higher dpi resolution is recommended for the best-quality scans. Prioritize models with exceptional color accuracy and depth. A scanner that boasts a high dynamic range will be able to capture the subtleties of color and shading in your original pieces. It’s also essential to consider the maximum scanning area; ensure it accommodates the largest artwork size you plan to scan. Look for scanners that can handle various media thicknesses, especially if you work with mounted pieces, canvases, or textured papers. Verify that the scanner software is compatible with your operating system and offers advanced features for fine-tuning the scan output. If you want choices, refer to this post for recommendations.
Which Photo Editing App should I use?
Adobe Photoshop is widely regarded as the industry standard for professional photographers and artists due to its comprehensive, advanced tools and features. For those seeking a more user-friendly interface that still offers powerful editing capabilities, Adobe Lightroom provides an excellent balance, particularly for batch editing and managing large numbers of photos. For artists and hobbyists looking for free alternatives, GIMP is a robust, open-source image editor that supports many Photoshop features.

Should I use a scanner or a digital camera?
A high resolution photograph taken with a camera under controlled lighting, using anti-glare equipment like polarizing lenses, can produce satisfactory digital files. However, these alternative methods often require more post-processing to achieve the highest-quality images.
When opting for a camera to digitize artwork, there are advantages and disadvantages to consider. The primary benefit of using a camera is flexibility; it can photograph large or oddly shaped pieces that may not fit on a scanner bed. Cameras can also be more portable than scanners, allowing onsite digitization without transporting the artwork. However, the downsides include the potential for distortion and the need for precise lighting to avoid glares and shadows within the photograph. These tasks require a nuanced understanding of photography and post-processing. In contrast to a flatbed scanner’s consistency and control over lighting and resolution, achieving a uniform contrast with a camera can be more challenging and often necessitates additional equipment such as polarizing filters and tripods.
Q. Photoshop vs GIMP
When deciding between Photoshop and GIMP for your image editing needs, it’s essential to weigh both the functionality and cost. Photoshop is a professional tool that offers an extensive range of features, plugins, and a familiar user interface for industry professionals. However, this comes with a monthly subscription fee, which may be prohibitive for some users. On the other hand, GIMP is a free and open-source option that provides many comparable features to Photoshop, making it accessible for artists and hobbyists who may be working with a tight budget. While GIMP’s interface and workflow can be less intuitive for those accustomed to Photoshop, it’s a powerful alternative for those willing to adapt to its environment.
Q. What File Format should I choose?
TIF is a preferred file format due to its non-destructive properties and the fact that it doesn’t compress your image. JPEG can also be used for a smaller file size with minimal compression to preserve resolution.
Q: How to Scan A Large Piece of Artwork
Scan larger artwork in sections and use photo editing software to stitch the digital images together. Make sure to overlap each scan slightly for seamless merging. Alternatively, you can utilize specialized large-format scanners to handle oversized artwork. These may be more expensive options, but they provide high resolution and efficient results for larger artworks. Overall, carefully planning and scanning your artwork correctly will result in better-quality digital images representing your original piece.
Q: How do I prevent shadows or uneven lighting on my scanned artwork?
A: Shadows and uneven lighting can be minimized by ensuring the artwork lies completely flat on the scanner bed and by using a scanner with a good dynamic range. Also, avoid having external light sources that interfere with the scanner lighting.
Q: What is feathering?
A: Feathering is a technique used in photo editing software that softens the edges of a selection by creating a transition zone between the selected and unselected pixels as two layers. This technique creates a more natural, blended effect, particularly useful when isolating a subject from its background. In image editing programs, you can adjust the degree of feathering to obtain the desired softness of your image’s edges.
Q: What resolution or correct pixel density should I scan my artwork?
A: If you want to enlarge the artwork or capture fine details, consider scanning at a higher resolution, like 600 dpi, dots per inch. Lower dpi will lead to lower resolution for digital image capture. In short, more pixels means more details are captured for most images.
Q: Do I need to edit my artwork after I finished the scan?
A: While scanning can capture a good representation of your artwork, you may need to adjust brightness, contrast, or color balance to match the original image.
Q: Can textured artwork be scanned, and how does it affect the result?
A: Yes, but the texture might create shadows and highlights that could alter the appearance of the digital image capture. Most scanners with a variable focus can help mitigate this issue.
Q: Is it necessary to clean the scanner before each use?
A: You don’t have to do this after every scan. However, keeping the scanner bed clean is essential to avoid dust, fingerprints, or smudges from appearing on your scanned images. Clean the glass gently with a soft, non-abrasive cloth before each scan.
Conclusion
In summary, digitizing artwork images effectively combines meticulous technique with the right tools. When seeking a scanner for your artwork, look for one with high bit depth, a high dynamic range, the ability to capture fine details at high resolutions, and a sizeable scanning bed to accommodate various art dimensions. Most scanners should be sufficient for medium size images.
Scanning large pieces may require piecing together multiple scans or using specialized equipment, while cameras offer more flexibility but can introduce distortion. Great digital captures depend on flat placement, controlled lighting, high-resolution settings, and post-scan edits to ensure faithfulness to the original art piece. Preferred file formats such as TIF maintain image size and resolution during storage. Regular scanner maintenance is crucial for pristine image captures.
For printing artwork properly, utilize a high-quality printer with archival ink, select the correct paper type for color accuracy and detail, and ensure the print settings are meticulously adjusted to match the digital file’s specifications.
As an artist, the digital frontier offers a canvas that extends far beyond the physical, and knowing how to scan artwork is the first step towards exploring those vast artistic horizons. I hope these insights and steps give you the confidence to embark on your scanning journey, reflecting and enhancing the beauty of your work in each digital file you create.